
Прежде чем перейти к статье, хочу вам представить, экономическую онлайн игру Brave Knights, в которой вы можете играть и зарабатывать. Регистируйтесь, играйте и зарабатывайте!
В соцсетях часто можно встретить алармистские заявления, что ChatGPT скоро заменит ряд профессий. В том числе программистов. Мне стало интересно проверить, способен ли ChatGPT написать работающий код, без какого-либо вмешательства со стороны человека.
Важные уточнения
Работа велась с бесплатной версией, без плагинов с доступом в интернет и тому подобного.
Все происходило в апреле 2023 года с наиболее актуальной на тот момент версией ChatGPT.
Процесс написания приложения занял 2 выходных дня.
Все общение с языковой моделью велось на английском языке, так что не берусь утверждать, что на других языках, в том числе на русском, были бы схожие результаты.
Для удобства чтения будут приводиться оригиналы и переводы на русский язык некоторых моих запросов и пересказ ответов ChatGPT.
У меня нет никакого опыта разработки на SWIFT и проектировании мобильных приложений как таковых.
Тем не менее за время учебы в бакалавриате я ознакомилась с принципами Объектно-ориентированное программирование</p>" data-abbr="ООП">ООП и некоторыми языками разработки.
Ни к каким сторонним источникам информации для чистоты эксперимента я не прибегала. Так что никакого Google или StackOverflow.
Статья носит ознакомительный характер и не является туториалом.
Планирование
В английском языке есть поговорка, которую вольно можно перевести как “Если вы провально планируете, то вы планируете провалиться”. Поэтому все началось с отбора функций будущего приложения.
“What would be the basic functions of a minimalistic to-do list iphone app?”
“Какие должны быть базовые функции минималистичного to-do приложения для айфона?

ChatGPT определил следующий функционал:
Создание задачи
Редактирование задачи*
Отметка задачи как выполненной
Удаление задачи
Установка напоминаний*
Категоризация задач*
Определение приоритетов задач*
Поиск задач*
Синхронизация между устройствами*
Резервное копирование* и восстановление
Далеко не все вошли в финальную версию, большинство было отметено из-за сложности реализации и несоответствия идее минималистичного приложения.
*не были реализованы
Давай создадим это приложение
ChatGPT сразу же предупреждает пользователя, что, как языковая модель, он не может создать приложение. Однако предлагает свои услуги как “проводника и гида”.

По запросу из заголовка чатбот выдает общий план и сообщает, что создание приложения требует большего количества деталей и времени. Но ничего, время у нас есть.
“Guide me step by step to create this app . provide me with detailed explanations and all the necessary code. note that i am a zero and am creating this app from scratch. be precise”
“Проведи меня шаг за шагом в создании этого приложения. Предоставь мне детальные объяснения и весь необходимый код. Учитывай, что я полный ноль и создаю это приложение тоже с нуля. Будь точным.”
На это чат сообщает, что создание полностью функционального to-do приложения с нуля - это сложный процесс, который содержит определенное количество шагов и требует знаний языков программирования и специальных инструментов. Также пишет более подробный план.
Creating a fully functional to‑do list iPhone app from scratch is a complex process that involves several steps and requires knowledge of several programming languages and tools. Here is a high‑level overview of the steps involved:
1. Choose a development platform: For developing an iPhone app, you need to use Apple's development platform Xcode, which is available for free from the App Store. Xcode is an integrated development environment (IDE) that provides all the necessary tools for building and testing iOS apps.
2. Create a new Xcode project: Open Xcode and create a new project by selecting "File" > "New" > "Project" from the main menu. Choose the "App" option, select "iOS" as the platform, and choose "Single View App" as the template.
3. Set up the project: Name your project and set the language to Swift. Select a location to save your project, and click "Create."
4. Design the user interface: Xcode provides a drag-and-drop interface builder that you can use to design your app's user interface. To add a new UI element, such as a button or a text field, drag it from the Object Library and drop it onto the design canvas.
5. Implement the functionality: Once you have designed the user interface, you need to implement the functionality of your to-do list app. Start by creating a data model to store the tasks, including the task name, due date, priority, and category. You can use the Swift programming language to define your data model.
6. Create a task list: Next, create a table view controller that displays the task list. The table view should display each task as a separate row and should include buttons for marking tasks as complete, editing tasks, and deleting tasks.
7. Add functionality to the task list: Implement the functions for adding a new task, marking a task as complete, editing a task, and deleting a task. Use the UITableViewDataSource and UITableViewDelegate protocols to handle the data source and delegate methods for the table view.
8. Add reminders: Add the ability for users to set reminders for their tasks. You can use the UNUserNotificationCenter framework to create and manage reminders.
9. Categorize tasks: Add the ability for users to categorize tasks by creating a new screen that allows users to select a category for each task. You can use the UIPickerView control to create a list of categories.
10. Prioritize tasks: Add the ability for users to prioritize tasks by allowing them to assign a priority level to each task. You can use UISegmentedControl to create a list of priority levels.
11. Test the app: Test the app thoroughly to ensure that it works as intended. Use the Simulator in Xcode to test the app on different iOS devices.
12. Publish the app: Once you are satisfied with the app, publish it to the App Store so that other users can download and use it.
Please note that this is only a high-level overview of the process, and each step may require a detailed explanation and additional code. You may need to follow detailed tutorials or seek guidance from experienced developers to build a fully functional to-do list iPhone app from scratch.
Отличный план, давай ему следовать
Следующим шагом стала просьба предоставить детальное объяснение и код для каждого шага.
“Nice plan we'll follow it
provide detailed explanation and code for each step”
После такого запроса ChatGPT наконец начинает давать подробные инструкции. Он сообщает, какую среду разработки выбрать, как создать проект и начать разрабатывать интерфейс. На этом моменте появляются первые строчки кода.

struct Task {
var name: String
var dueDate: Date?
var priority: Int
var category: String
}
Проблема с ChatGPT состоит в том, что есть ограничение на длину ответа. Это может стать существенной преградой в написании кода. Чат прерывается на полуслове и продолжает не всегда с того места, на котором закончил.
Далее будет пример прерванного кода:
import UIKit
class ViewController: UIViewController, UITableViewDelegate {
var tasks = Task
var recentlyDeletedTasks = Task
weak var textField: UITextField!
var tableView: UITableView!
override func viewDidLoad() {
super.viewDidLoad()
setupViews()
}
private func setupViews() {
let addButton = UIBarButtonItem(barButtonSystemItem: .add, target: self, action: #selector(addTask(:)))
navigationItem.rightBarButtonItem = addButton
let tableView = UITableView()
tableView.translatesAutoresizingMaskIntoConstraints = false
tableView.register(UITableViewCell.self, forCellReuseIdentifier: "TaskCell")
tableView.delegate = self
tableView.dataSource = self
view.addSubview(tableView)
NSLayoutConstraint.activate([
tableView.topAnchor.constraint(equalTo: view.safeAreaLayoutGuide.topAnchor),
tableView.leadingAnchor.constraint(equalTo: view.safeAreaLayoutGuide.leadingAnchor),
tableView.trailingAnchor.constraint(equalTo: view.safeAreaLayoutGuide.trailingAnchor),
tableView.bottomAnchor.constraint(equalTo: view.safeAreaLayoutGuide.bottomAnchor)
])
}
@objcc func addTask( sender: Any) {
// Create a new task with the data from the text field
let task = Task(name: textField.text!, dueDate: nil, priority: 1, category: "Uncategorized")
// Add the task to the array
tasks.append(task)
// Clear the text field
textField.text = ""
// Dismiss the keyboard
textField.resignFirstResponder()
// Reload the table view to display the new task
tableView.reloadData()
}
}
extension ViewController: UITableViewDataSource {
func tableView(_ tableView: UITableView, cellForRowAt indexPath: IndexPath) -> UITableViewCell {
let cell = tableView.dequeueReusableCell(withIdentifier: "TaskCell", for: indexPath)
if indexPath.section == 0 {
let task = tasks[indexPath.row]
cell.textLabel?.text = task.name
} else if indexPath.section == 1 {
let task = recentlyDeletedTasks[indexPath.row]
cell.textLabel?.text = task.name
cell.textLabel?.textColor = .red // Change the text color to red to indicate recently deleted task
}
return cell
}
func tableView(_ tableView: UITableView, numberOfRowsInSection section: Int) -> Int {
if section == 0 {
// Return the number of tasks in the array
return tasks.count
} else if section == 1 {
// Return the number of recently deleted tasks
return recentlyDeletedTasks.count
}
return 0
}
func numberOfSections(in tableView: UITableView) -> Int {
return 2
}
func tableView(_ tableView: UITableView, commit editingStyle: UITableViewCell.EditingStyle, forRowAt indexPath: IndexPath) {
if editingStyle == .delete {
// Remove the task from the array
let deletedTask = tasks[indexPath.row]
tasks.remove(at: indexPath.row)
recentlyDeletedTasks.append(deletedTask)
// Delete the row from the table view
tableView.deleteRows(at: [indexPath], with: .fade)
}
}
}
extension ViewController: UITableViewDelegate {
func tableView(_ tableView: UITableView, didSelectRowAt indexPath: IndexPath) {
tableView.deselectRow(at: indexPath, animated: true)
}
}
extension ViewController: UITextFieldDelegate {
func textFieldShouldReturn(_ textField:
Для решения проблемы прерываний я прибегала к двум методам.
1) Просить чат расписать решение по шагам.
2) Просить его привести только ту часть кода, которая интересует на данный момент.
Например так:

To implement the hide/reveal functionality for the Recently Deleted section, you would need to replace the following block of code:
if !recentlyDeletedItems.isEmpty {
Text("Recently Deleted")
.font(.headline)
.padding(.horizontal)
List {
ForEach(recentlyDeletedItems, id: .id) { item in
HStack {
Toggle(isOn: Binding<Bool>(get: {
self.selectedItems.contains(recentlyDeletedItems.firstIndex(of: item)!)
}, set: { newValue in
let index = recentlyDeletedItems.firstIndex(of: item)!
if newValue {
self.selectedItems.insert(index)
} else {
self.selectedItems.remove(index)
}
recentlyDeletedItems[index].isIncluded = newValue
})) {
Text(item.title)
}
}
}
}
.listStyle(.insetGrouped)
.padding(.horizontal)
}
with the following code:
HStack {
Text("Recently Deleted")
.font(.headline)
.padding(.horizontal)
Spacer()
Button(action: {
self.showingRecentlyDeleted.toggle()
}) {
Image(systemName: showingRecentlyDeleted ? "chevron.up" : "chevron.down")
.foregroundColor(.blue)
}
}
if showingRecentlyDeleted {
List {
ForEach(recentlyDeletedItems, id: .id) { item in
HStack {
Toggle(isOn: Binding<Bool>(get: {
self.selectedItems.contains(recentlyDeletedItems.firstIndex(of: item)!)
}, set: { newValue in
let index = recentlyDeletedItems.firstIndex(of: item)!
if newValue {
self.selectedItems.insert(index)
} else {
self.selectedItems.remove(index)
}
recentlyDeletedItems[index].isIncluded = newValue
})) {
Text(item.title)
}
}
}
}
.listStyle(.insetGrouped)
.padding(.horizontal)
}
```
Порой этот метод давал сбой, ChatGPT сообщал, что часть кода не нуждается в замене. Необходимо было повторять, что от него требуется, тогда он выдавал необходимую информацию:

4. Но у меня нет этого файла
Временами ChatGPT “заговаривается”. Начинает упоминать файлы, о которых раньше не шло и речи. Возможно он, как и многие из нас, хотел это сказать, подумал что сказал, но на самом деле нет. Предположительно это связано именно с ограничением на длину ответа. То есть эта часть текста подразумевалась, но из-за прерывания так и не была отображена пользователю. А вот для ChatGPT она все же существовала. Еще одна гипотеза основывается на вероятных источниках знаний, на которых чат обучался. Как подтверждает сам ChatGPT, он обучался на открытых источниках, в том числе на коде с GitHub и StackOverflow. Это означает, что весь генерируемыйй чатом код - это компиляция из чужих “модулей”.

Так как в базе знаний ChatGPT содержится код с упомянутых платформ, в этом коде скорее всего есть импорты из иных компонент. А значит в коде от чата вполне может затесаться импорт несуществующих файлов.
ChatGPT предлагает выбрать ViewController, но такого файла нет. Приходится об этом напоминать. Чат дает инструкции, что сделать, чтобы создать файл:

Один раз я столкнулась с тем, что чат “забыл”, что мы делаем приложение на IPhone, а не на Mac, и предложил решение “раз уж ты делаешь macOS приложение”. Пришлось его одернуть.


Извинения от ChatGPT:

5. Баги, баги, баги
Процесс исправления ошибок в чатботе довольно прост. Вы копируете текст ошибки, отправляете запрос и получаете ответ. Но, к сожалению, не всегда это приводит к решению проблемы. Может произойти такое, что работаете вы с новейшим оборудованием и в последней версии среды разработки, а у ChatGPT устаревшие данные и познания о нормах. Как уже было сказано, в эксперименте не предполагалось использование внешних источников. Так что приходилось просить чат написать альтернативное решение запроса. В большинстве же случаев все заканчивалось благополучно.
Далее будет несколько примеров, как чат исправляет свои ошибки.
Тут ChatGPT извиняется за ошибку в предыдущем ответе и предлагает исправленный вариант:

Здесь он дает недостающий кусок кода:

Сообщаю чату, что проблема не исчезла. Он дает альтернативные инструкции:

Но происходили и ситуации, когда чат считал, что все ошибки уже исправлены, хотя они еще оставались, в таких ситуациях чаще всего было достаточно повторно отправить название ошибки или сообщить, что ошибки все еще имеют место:

Иногда ChatGPT приводил для исправления ровно тот же код, который нуждался в правках. Необходимо было ему об этом сообщить. Он извинялся и присылал исправленную версию.

Процесс исправления багов занял большую часть времени всего проекта, половину субботы и все воскресенье. Одним из наиболее продуктивных решений (с точки зрения исхода) стало отправлять весь код из файла и просить найти ошибку. Это давало лучшие результаты, чем пытаться десять раз спросить о конкретной ошибке.
Ниже будет пример того, что ChatGPT отвечает, если просто прислать ему простыню кода. Не требуется даже просить его найти ошибку, хотя так я тоже делала (перед вставкой кода добавить “найди ошибки”/”find errors”).
It seems like you have defined the tableView delegate and datasource methods inside the addTask function, which is not the correct way to define them. You need to define them outside the addTask function and also make sure to conform to the UITableViewDataSource and UITableViewDelegate protocols in your ViewController class. Here's an updated code that should work:
import UIKit
class ViewController: UIViewController {
var tasks = Task
weak var textField: UITextField!
override func viewDidLoad() {
super.viewDidLoad()
setupViews()
}
private func setupViews() {
let addButton = UIBarButtonItem(barButtonSystemItem: .add, target: self, action: #selector(addTask(:)))
navigationItem.rightBarButtonItem = addButton
let tableView = UITableView()
tableView.translatesAutoresizingMaskIntoConstraints = false
tableView.register(UITableViewCell.self, forCellReuseIdentifier: "TaskCell")
tableView.delegate = self
tableView.dataSource = self
view.addSubview(tableView)
NSLayoutConstraint.activate([
tableView.topAnchor.constraint(equalTo: view.safeAreaLayoutGuide.topAnchor),
tableView.leadingAnchor.constraint(equalTo: view.safeAreaLayoutGuide.leadingAnchor),
tableView.trailingAnchor.constraint(equalTo: view.safeAreaLayoutGuide.trailingAnchor),
tableView.bottomAnchor.constraint(equalTo: view.safeAreaLayoutGuide.bottomAnchor)
])
}
@objcc func addTask( sender: Any) {
// Create a new task with the data from the text field
let task = Task(name: textField.text!, dueDate: nil, priority: 1, category: "Uncategorized")
// Add the task to the array
tasks.append(task)
// Clear the text field
textField.text = ""
// Dismiss the keyboard
textField.resignFirstResponder()
// Reload the table view to display the new task
tableView.reloadData()
}
}
extension ViewController: UITableViewDataSource {
func tableView(_ tableView: UITableView, numberOfRowsInSection section: Int) -> Int {
// Return the number of tasks in the array
return tasks.count
}
func tableView(_ tableView: UITableView, cellForRowAt indexPath: IndexPath) -> UITableViewCell {
// Dequeue a reusable cell from the table view
let cell = tableView.dequeueReusableCell(withIdentifier: "TaskCell", for: indexPath)
// Get the task for this row
let task = tasks[indexPath.row]
// Configure the cell with the task data
cell.textLabel?.text = task.name
return cell
}
func tableView(_ tableView: UITableView, commit editingStyle: UITableViewCell.EditingStyle, forRowAt indexPath: IndexPath) {
if editingStyle == .delete {
// Remove the task from the array
tasks.remove(at: indexPath.row)
// Delete the row from the table view
tableView.deleteRows(at: [indexPath], with: .fade)
}
}
}
extension ViewController: UITableViewDelegate {
func tableView(_ tableView: UITableView, didSelectRowAt indexPath: IndexPath) {
tableView.deselectRow(at: indexPath, animated: true)
}
}
```
Make sure to replace Task with your own Task model class. I hope this helps!
Однако, можно столкнуться с тем, что чат просто начнет рассказывать, что делает ваш код. Так что лучше все же добавлять просьбу найти баги.
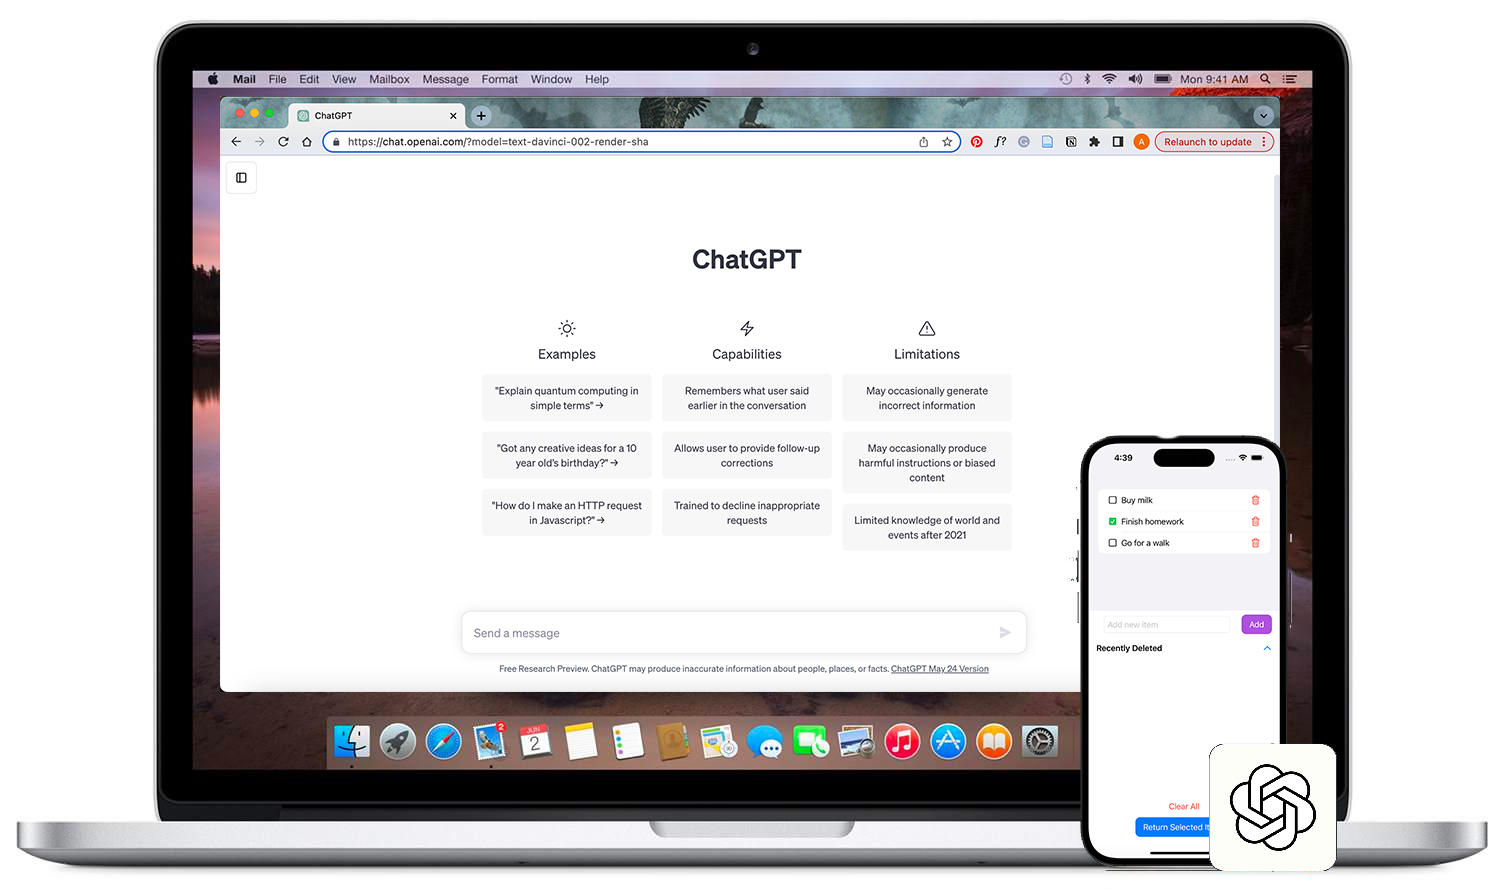
This code defines a SwiftUI view for a todo list app. It includes a list of todo items, a way to add new items, and the ability to delete items and move them to a "Recently Deleted" section. The user can also select multiple items at once and perform actions on them, such as deleting or restoring them.
The TodoItem struct defines the properties of a todo item, including a unique identifier, a title, a boolean value indicating whether the item is completed, and a boolean value indicating whether the item is included in the list of recently deleted items.
The view includes several state variables, including selectedItems (a set of indices of selected items), showingRecentlyDeleted (a boolean indicating whether the "Recently Deleted" section is currently shown), newItemTitle (a string representing the title of a new item being added), isOn (a boolean representing the state of a switch control), todoItems (an array of TodoItem objects representing the current list of todo items), recentlyDeletedItems (an array of TodoItem objects representing the list of recently deleted items), and showingDeleteAlert (a boolean indicating whether the user has requested to delete an item).
The view includes a List view that displays the current list of todo items, with each item represented by a HStack containing a checkbox, the item title, and a trash can icon. The user can tap the checkbox to mark an item as completed, tap the title to select an item, and tap the trash can icon to delete an item.
The view also includes a HStack containing a text field and a button to add a new todo item to the list.
Finally, the view includes a section for recently deleted items that can be expanded or collapsed by tapping a chevron icon. Each recently deleted item is represented by a HStack containing a checkbox, the item title, and a button to restore the item. The user can select multiple items by tapping the checkboxes and can restore them all at once by tapping a "Return Selected Items" button.
6. Больше функций. И багов.
Пожалуй, самым проблемным было внедрение функций, которых не было в изначальном плане ChatGPT. Со временем добавились папка с удаленными задачами и возможность восстановления пунктов списка задач.
В процессе добавления новых функций потерялась возможность отмечать выполненными несколько пунктов. Сколько бы попыток поиска ошибки не предпринималось (около 5 часов однотипных запросов, в том числе копий всего кода), это не давало никаких результатов, чат упорно не видел ни единой ошибки.

Причина неработающей функции так и не была найдена. Знаний чатбота на данном этапе на это не хватает.
Выводы
Написать приложение с нулевыми знаниями языка программирования, используя ChatGPT, оказалось вполне возможно. Есть несколько “но”, которые стоит учитывать:
Понадобится определенное количество времени(около получаса), чтобы подобрать правильный запрос и вывести бота на нужные рельсы.
Приложение должно быть довольно простым. Попытки написать полноценное приложение для ведения бюджета успехом не увенчались, ChatGPT давал неработающие API и советовал воспользоваться библиотеками, которые уже не поддерживаются. У меня не получилось, но в твиттере я натыкалась на тред человека, который смог создать как минимум конвертер валют.
Будет много ошибок в коде. В среднем выходило 1-2 ошибки на каждый кусок кода, который ChatGPT выдавал. Не все из них удастся исправить силами одного лишь чатбота.
Большую часть времени (75% по моему опыту) займет устранение ошибок. Остальные шаги, включая планирование функционала и дизайна интерфейса, отнимут не более нескольких часов.
Если среди вас найдутся эксперты в SWIFT, была бы благодарна, если бы вы оценили качество кода, который сгенерировал ChatGPT.


