
In this article we will once again return to the tired topic of webinars and webinar hosting tools. And no, we're not about to code a whole new system for webinar hosting – there are already plenty of those. Instead, we will talk about connecting drawing software to the webinar, so that you could manually draw and broadcast the process.
At first glance, the solutions are readily available. All you seem to need is to add a canvas to the page (HTML 5 element "Canvas"), and start drawing. Well, adding it is easy enough, but the question is how to transmit the drawing process into WebRTC.
So, let us take a closer look at what WebRTC streaming from canvas (or Canvas streaming) is, and what pitfalls you might want to look out for.
What is Canvas?
Let's see what Wikipedia has to say about it.
Canvas is an HTML5 element, dedicated to creating raster-based 2D images using scripts, usually based on JavaScript. It is generally used for rendering graphs and figures for articles.
The pros of using Canvas are as follows:
it supports hardware acceleration;
it is capable of manipulating any and each pixel separately;
The cons are as follows:
it overloads the processor and RAM;
its garbage collector is limited and provides no option to clear memory;
it requires manual handling of object events;
it doesn't run well at high resolutions;
it requires each element to be rendered separately.
The cons seem to outweigh the pros. However, despite that, Canvas does have a great advantage: it makes it possible to stream slide shows and draw over them during the webinar.
Quirks of stream capture
Upon capturing a stream from a Canvas element the browser considers it black. That means a black text will merge with the background upon capture and the stream will look like a black screen. The same thing can happen when rendering a .png image with transparent background and black lines.

Also note, that the stream cannot consist of one frame. That means once you've put a static image on the Canvas, the stream won't form because there is only one frame in it. The solution is to render the static images cyclically.
For instance, the following function continually refreshes a Canvas-rendered image at 30 fps:
function loop(){
        canvasContext.drawImage(img, 10, 10);
        setTimeout(loop, 1000 / 30); // drawing at 30fps
    }
Another point has to do with a browser security measure known as Same-origin Policy.
The image that is to be drawn on the Canvas must be hosted locally on the server or on a server within the same domain. If the image to be rendered is downloaded from the Internet, the browser will signal exception.
This issue can be resolved using the Cross-Origin Resource Sharing (CORS) technology, but that solution is beyond the scope of this article.
How-to guides for readying Canvas
As is tradition, we are going to provide how-to guides. Of those, there are two:
Text rendering via Canvas and WebRTC-flavored streaming
Image rendering via Canvas and consequent WebRTC streaming
HTML-related parts are going to be virtually identical. Create a HTML file named canvas-streaming-min.html
In the page's head, write down the access to scripts:
<script type="text/javascript" src="../../../../flashphoner.js"></script>
<script type="text/javascript" src="canvas-streaming-min.js"></script>
In the body, deploy the HTML 5 Canvas element and div element for streaming. Set the Flashphoner API to initialize upon loading of the HTML page:
<body onload="init_page()">
        <canvas width="480" height="320" id="canvas"></canvas>
        <div id="localDisplay" hidden></div>
        <br>
</body>
For a simple example, let's add an image to be rendered into the HTML file for the canvas. The image file is stored in the same server folder as the example files:
<img src="2307589.png" alt="logo" id="myimage" >Here's the complete code of an HTML page for a canvas with text:
<!DOCTYPE html>
<html lang="en">
<head>
        <script type="text/javascript" src="../../../../flashphoner.js"></script>
        <script type="text/javascript" src="canvas-streaming-min.js"></script>
</head>
<body onload="init_page()">
        <canvas width="480" height="320" id="canvas"></canvas>
        <div id="localDisplay" hidden></div>
</body>
</html>
For a canvas with images:
<!DOCTYPE html>
<html lang="en">
<head>
        <script type="text/javascript" src="../../../../flashphoner.js"></script>
        <script type="text/javascript" src="canvas-streaming-min.js"></script>
</head>
<body onload="init_page()">
        <canvas width="480" height="320" id="canvas"></canvas>
        <div id="localDisplay" hidden></div>
        <br>
        <img src="2307589.png" alt="logo" id="myimage" >
</body>
</html>
Now, let us move to JS scripts.
Text rendering via Canvas with WebRTC spin
Determine the constants and the global variables:
var SESSION_STATUS = Flashphoner.constants.SESSION_STATUS;
var STREAM_STATUS = Flashphoner.constants.STREAM_STATUS;
var session;
var canvas;
var localDisplay;
Write "Hello World" on the canvas. Draw a yellow rectangle sized 320px by 176px, font – Arial, text size – 30px, color - blue. Use the "loop()" function (mentioned above) to keep redrawing the canvas at 30 fps:
function createCanvas() {
    var canvasContext = canvas.getContext ("2d");
    canvasContext.font = "30px Arial";
    canvasContext.fillStyle = "yellow";
    canvasContext.fillRect(0,0,320,176);
    canvasContext.strokeStyle = 'black';
    canvasContext.fillStyle = "blue";
    (function loop(){
        canvasContext.fillText("Hello World!", 10, 50);
        setTimeout(loop, 1000 / 30); // drawing at 30fps
    })();
}
Connect to a WCS server via WebSocket and publish the stream of the canvas:
//Connect to WCS server over webSockets
function connect() {
    session = Flashphoner.createSession({
        urlServer: "wss://demo.flashphoner.com:8443" //specify the address of your WCS
    }).on(SESSION_STATUS.ESTABLISHED, function(session) {
        publishStream(session);
    });
}

//Capturing stream of Canvas element
function publishStream(session) {
    publishStream = session.createStream({
        name: "test-canvas",
        display: localDisplay,
        constraints: {
            audio: false,
            video: false,
            customStream: canvas.captureStream(30)
        }
    });
    publishStream.publish();
}
Here's the full JS script code for rendering a canvas with text and capturing it for the stream:
var SESSION_STATUS = Flashphoner.constants.SESSION_STATUS;
var STREAM_STATUS = Flashphoner.constants.STREAM_STATUS;
var session;
var canvas;
var localDisplay;

 //init api
function init_page() {
    Flashphoner.init({});
    localDisplay = document.getElementById("localDisplay");
    canvas = document.getElementById("canvas");
    createCanvas();
    connect();
}

//create Canvas
function createCanvas() {
    var canvasContext = canvas.getContext ("2d");
    canvasContext.font = "30px Arial";
    canvasContext.fillStyle = "yellow";
    canvasContext.fillRect(0,0,320,176);
    canvasContext.strokeStyle = 'black';
    canvasContext.fillStyle = "blue";
    (function loop(){
        canvasContext.fillText("Hello World!", 10, 50);
        setTimeout(loop, 1000 / 30); // drawing at 30fps
    })();
}

//Connect to WCS server over webSockets
function connect() {
    session = Flashphoner.createSession({
        urlServer: "wss://demo.flashphoner.com:8443" //specify the address of your WCS
    }).on(SESSION_STATUS.ESTABLISHED, function(session) {
        publishStream(session);
    });
}

//Capturing stream of Canvas element
function publishStream(session) {
    publishStream = session.createStream({
        name: "test-canvas",
        display: localDisplay,
        constraints: {
            audio: false,
            video: false,
            customStream: canvas.captureStream(30)
        }
    });
    publishStream.publish();
}
Hello, world!
Open a created Webpage. In this example we are not using buttons, so the canvas is rendered immediately upon page initialization:
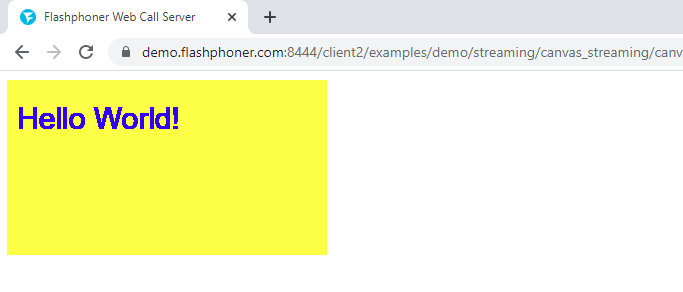
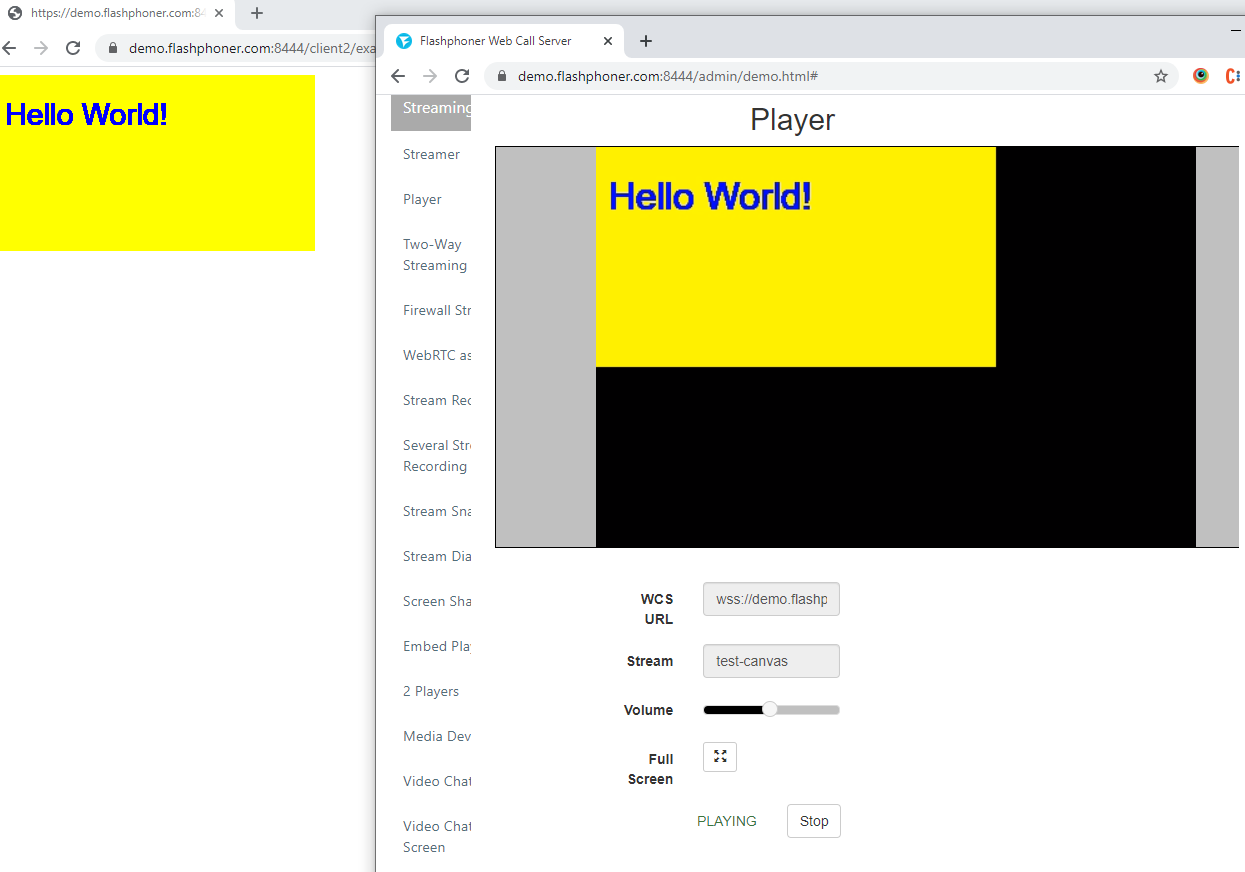
In another browser tab, open the demo-example "Player" on you WCS server. Specify the name of the stream that is capturing the canvas and start the stream. Here's the image of the original canvas and how the stream should look in the player:
Rendering images via Canvas and streaming via WebRTC
Determine the constants and the global variables:
var SESSION_STATUS = Flashphoner.constants.SESSION_STATUS;
var STREAM_STATUS = Flashphoner.constants.STREAM_STATUS;
var session;
var canvas;
var localDisplay;
Upon receiving the image from the webpage, start cyclically rendering it on the canvas at 30 fps:
function createCanvas() {
    var canvasContext = canvas.getContext ("2d");
    var img = document.getElementById ("myimage");
    (function loop(){
        canvasContext.drawImage(img, 10, 10);
        setTimeout(loop, 1000 / 30); // drawing at 30fps
    })();
}
Connect to a WCS server via WebSocket and publish the stream of the canvas:
//Connect to WCS server over webSockets
function connect() {
    session = Flashphoner.createSession({
        urlServer: "wss://demo.flashphoner.com:8443" //specify the address of your WCS
    }).on(SESSION_STATUS.ESTABLISHED, function(session) {
        publishStream(session);
    });
}

//Capturing stream of Canvas element
function publishStream(session) {
    publishStream = session.createStream({
        name: "test-canvas",
        display: localDisplay,
        constraints: {
            audio: false,
            video: false,
            customStream: canvas.captureStream(30)
        }
    });
    publishStream.publish();
}
Here's a full JS script code for rendering a canvas with images and capturing it for the stream:
var SESSION_STATUS = Flashphoner.constants.SESSION_STATUS;
var STREAM_STATUS = Flashphoner.constants.STREAM_STATUS;
var session;
var canvas;
var localDisplay;

 //init api
function init_page() {
    Flashphoner.init({});
    localDisplay = document.getElementById("localDisplay");
    canvas = document.getElementById("canvas");
    createCanvas();
    connect();
}

//create Canvas
function createCanvas() {
    var canvasContext = canvas.getContext ("2d");
    var img = document.getElementById ("myimage");
    (function loop(){
        canvasContext.drawImage(img, 10, 10);
        setTimeout(loop, 1000 / 30); // drawing at 30fps
    })();
}

//Connect to WCS server over webSockets
function connect() {
    session = Flashphoner.createSession({
        urlServer: "wss://demo.flashphoner.com:8443" //specify the address of your WCS
    }).on(SESSION_STATUS.ESTABLISHED, function(session) {
        publishStream(session);
    });
}

//Capturing stream of Canvas element
function publishStream(session) {
    publishStream = session.createStream({
        name: "test-canvas",
        display: localDisplay,
        constraints: {
            audio: false,
            video: false,
            customStream: canvas.captureStream(30)
        }
    });
    publishStream.publish();
}
Hello, world! Part two
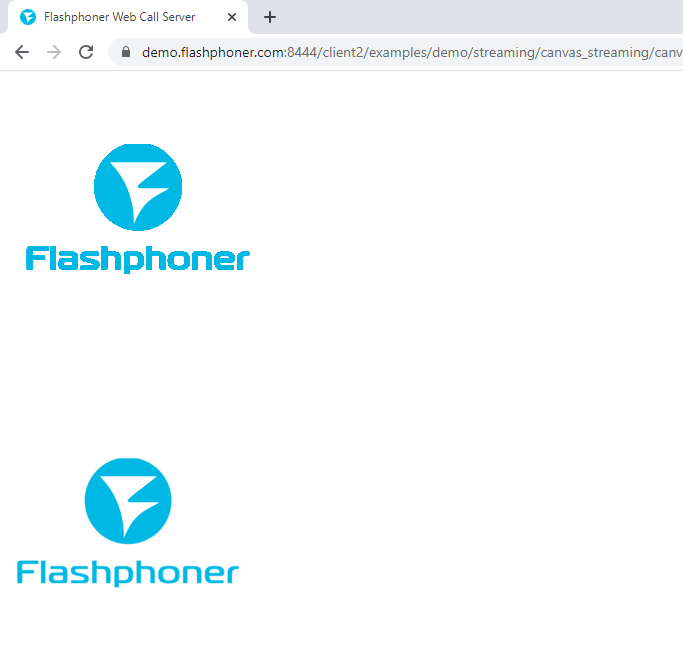
Open the created webpage. The canvas will be rendered immediately upon page initialization. The image (bottom of the page) is displayed on the canvas (top of the page):
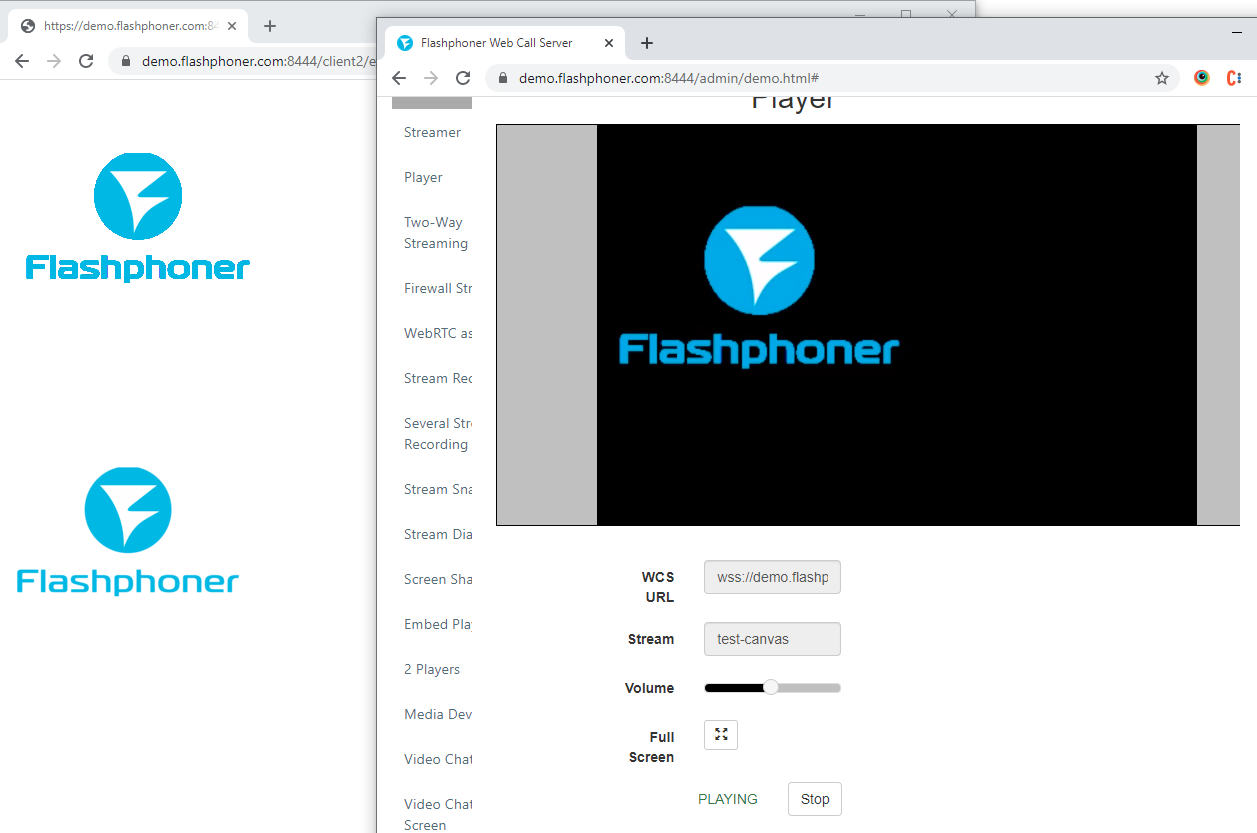
Open the demo-example "Player" on your WCS server. Specify the name of the stream that is capturing the canvas and start the stream. Here's the image of the original canvas and how the stream should look in the player:
Conclusion
With this article we didn't aim to break new ground. Our tech support has received questions on canvas streaming and so we undertook to provide you with some basic code that might help you use the canvas functionality in your project.
Good streaming to you!
Links
Demo
WCS on Amazon EC2
WCS on DigitalOcean
WCS in Docker
Quick deployment and testing of the server
Stream Capturing and publish from an HTML5 Canvas element (whiteboard)


